Loan Maintenance / Collateral Loan Upload / Map & Upload
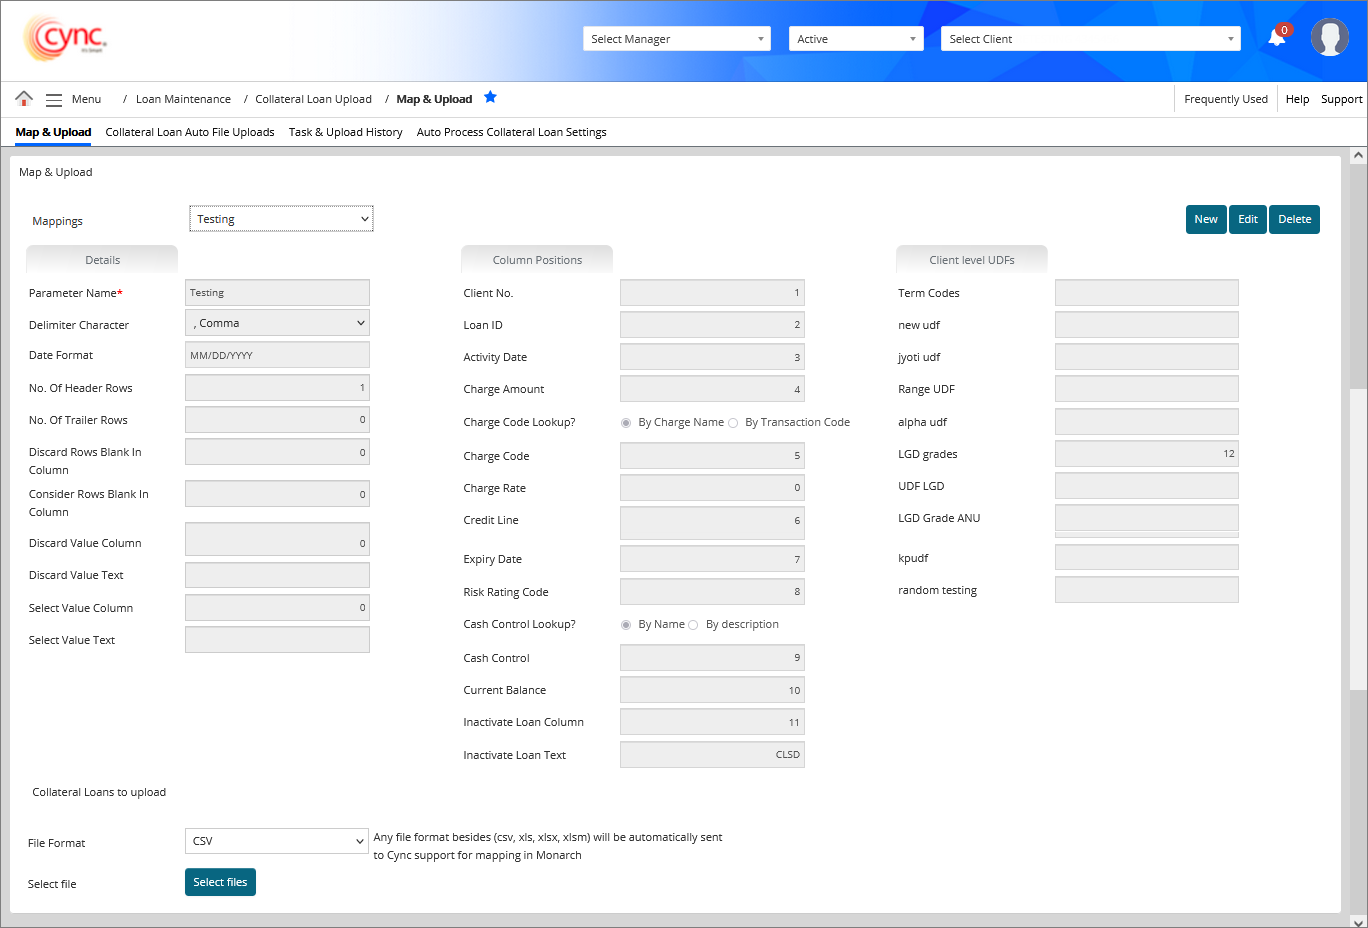
Map & Upload
The Map & Upload page allows you to map and upload new collateral loan data. It also allows you to update the existing loan data.
In the Map and Upload page, the UDFs under Client level UDFs display the column number to which it is mapped to (this is based on the uploaded collateral loan excel file) .
Navigation: Loan Maintenance → Collateral Loan Upload → Map & Upload
Refer to the screenshot:
 The UDF values as provided in the collateral loan excel file is updated in the UDFs in Basic Client Details page.
Fields and Descriptions
|
Fields |
Descriptions |
|
Mappings |
Includes the list of mapped file names. |
|
Parameter Name |
Specifies collateral's loan transaction parameter name. |
|
Delimiter Character |
Specifies delimiter character automatically based on mappings. |
|
Date Format |
Specifies the date format. The default date format is M/D/Y. It also supports the date formats such as MM/DD/YYYY and MM-DD-YYYY. |
|
No. Of Header Rows |
Specifies the number of header rows to display. |
|
No. Of Trailer Rows |
Specifies the number of trailer rows to display. |
|
Discard Rows Blank in Column |
Specifies the position number of column having blank row to be discarded in the file you are mapping.
|
|
Consider Rows Blank in Column |
Specifies the position number of column having blank row to be considered in the file you are mapping irrespective of mapping the same row in Discard Value Text/Select Value Text fields.
|
|
Discard Value Column |
Specifies the position number of column to be discarded in the file you are mapping.
|
|
Discard Value Text |
Specifies the text to be discarded in the file you are mapping, based on the value inputted in the Discard Value Column field. This field is enabled only after the value is inputted in Discard Value Column field.
|
|
Select Value Column |
Specifies the position number of column to be only uploaded in the file you are mapping.
|
|
Select Value Text |
Specifies the text to be uploaded in the file you are mapping, based on the value inputted in the Select Value Column field. This field is enabled only after the value is inputted in Select Value Column field.
|
|
Client No. |
Specifies the column position for the Client No. in the file you are mapping. |
|
Loan ID |
Specifies the column position for Loan ID in the file you are mapping. The default value is 0. |
|
Activity Date |
Specifies the column position for the Activity Date in the file you are mapping. |
|
Charge Amount |
Specifies the column position for the Charge Amount in the file you are mapping. |
|
Charge Code Lookup? |
Specifies the column position for the Charge Code Lookup? in the file you are mapping. Select any one of the following options:
|
|
Charge Code |
Specifies the column position for the charge code in the file you are mapping. |
|
Charge Rate |
Specifies the column position for the Charge Rate in the file you are mapping. |
|
Credit Line |
Specifies the column position for the Credit Line in the file you are mapping. |
|
Expiry Date |
Specifies the column position for the Expiry Date in the file you are mapping. |
|
Risk Rating Code |
Specifies the column position for the Risk Rating Code in the file you are mapping. |
|
Cash Control Lookup? |
Specifies the column position for the Cash Control Lookup? in the file you are mapping. Select any one of the following options:
|
|
Cash Control |
Specifies the column position for the cash control data in the file you are mapping. |
|
Current Balance |
Specifies the column position for the Current Balance in the file you are mapping. |
|
Inactive Loan Column |
Specifies the position number of column in the file you are mapping to make the loan status as Inactive.
|
|
Inactive Loan Text |
Specifies the text where the column contained text in the file you are mapping, to make the loan status as inactive.
|
| New UDF |
It specifies the User Defined Field (UDFs) name.
|
In the Map & Upload page, you can map the collateral loan file of a client by considering the following conditions:
When Charge Code Column is Selected or Discarded
Allows the user to to Select/Discard loan level transactions related to Charge Codes (transactions with other charge codes will not be included) and also client level transactions related to UDF, Cash Controls, LGD Grades etc. is updated in Basic Client Detail page. In both the cases, the entire row is selected or discarded on file upload.
Other Fields besides Charge Code is Selected or Discarded
Allows the user to Select/Discard other fields besides Charge Code. Transactions with other charge codes is Selected or Discarded.
Multiple Fields are Selected/Discarded
When multiple fields are Selected/Discarded, then it considers all the transaction from the Selected/Discarded fields and ignores the loan transactions only from unselected fields.
For example, when multiple fields are entered in Discard Value Column with comma separator, if entered field is loan transactions then only those transactions is eliminated and client level is uploaded, but if client level fields are entered then the entire row is eliminated.
Select and Discard are used simultaneously
If Select and Discard function is used together then the Select and Discard value works simultaneously on file upload.
Click on  icon next to Discard Value Column. The following message displays.
If the column number is the same for Discard Value Column and Charge Code.
If the column number is different for Select Value Column and Charge Code.
Refer to the screenshot: 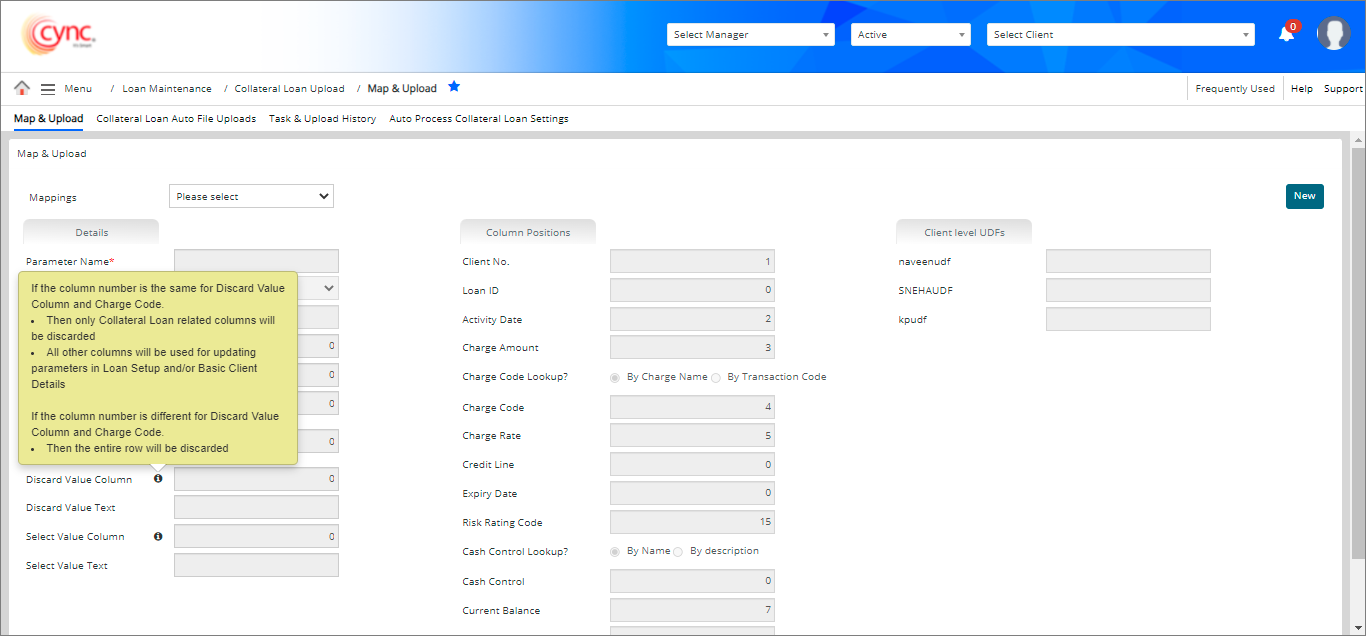
Click on icon next to Select Value Column. The following message displays.
If the column number is the same for Select Value Column and Charge Code.
If the column number is different for Select Value Column and Charge Code.
Refer to the screenshot: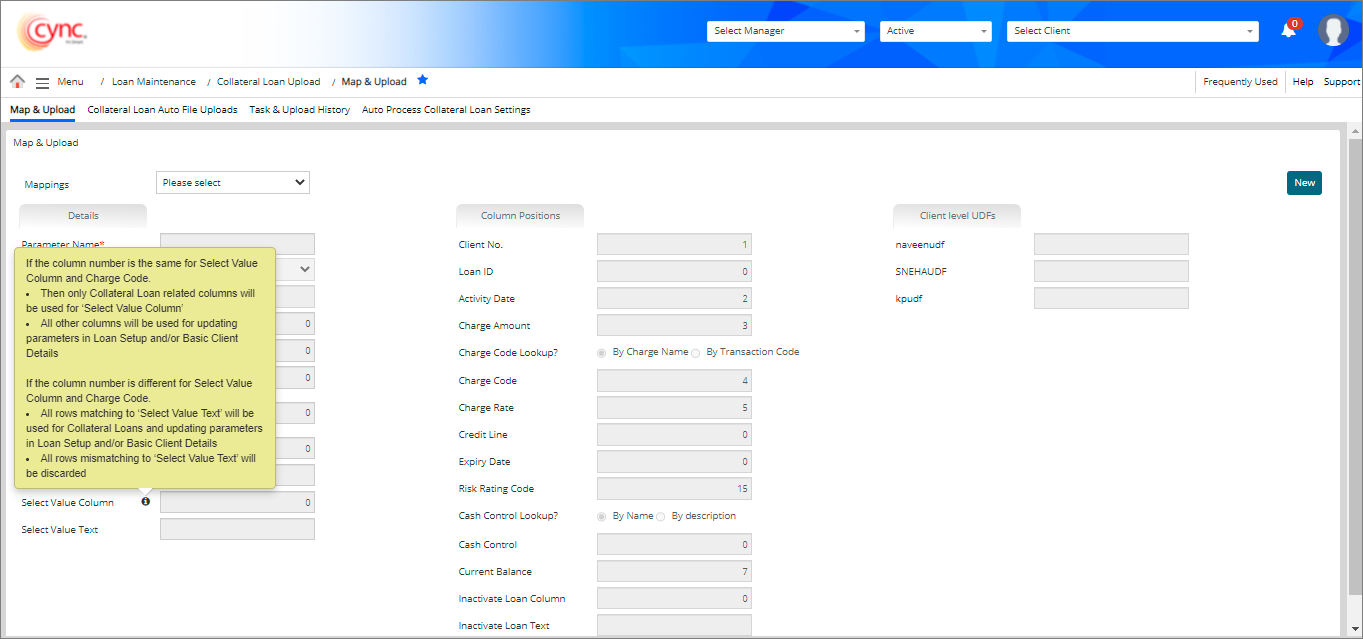
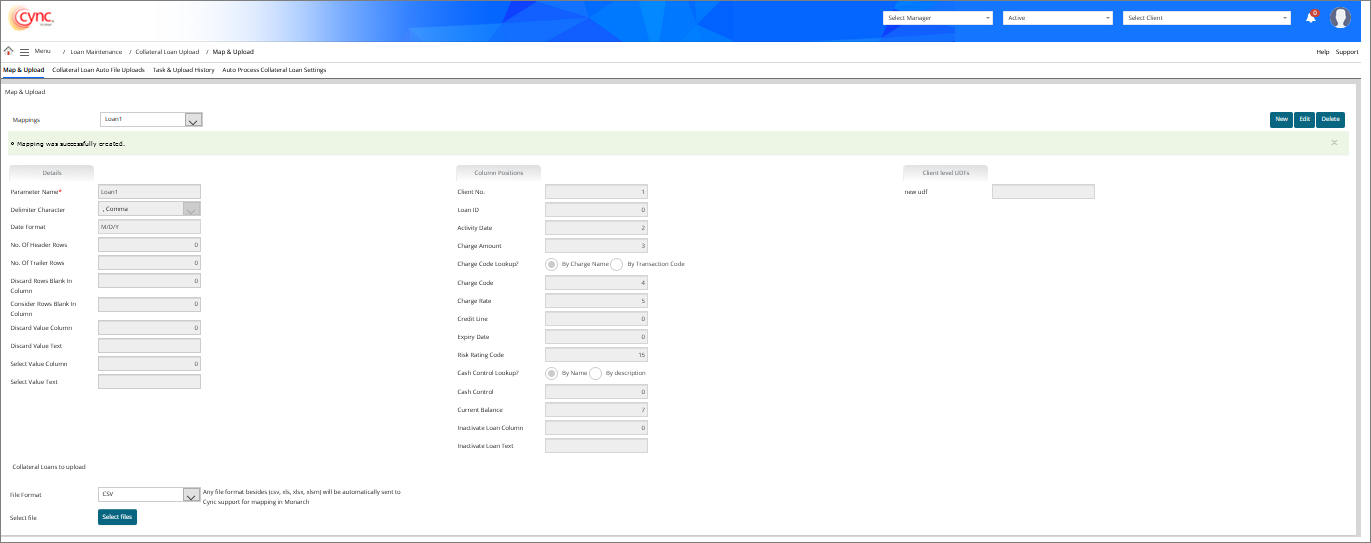
To map a file, perform these steps:
1. Go to Menu → File Uploads → Collateral Loan Upload → Map & Upload. Map & Upload page appears.
2. Click the  button.
3. Enter field values under Details and Columns sections. A Collateral Loans to Upload section appears below.
In the Mapping field, the parameter name would be taken as mapping name. This field is auto-generated. You may also select the existing mapping in Mapping field from drop-down list.
4. In the File Format field, select the file type from drop-down list.
5. In Sheet No field, enter the sheet number. For .xls, .xlsx and .xlsm file formats, enter the number for the sheet being exported.
This field will be displayed only if the file format is selected as XLS/XLSX/XLSM in the File Format field.
6. In the Select file field, click Choose File and select the file. A message, "Selected file queued to upload collateral loan transactions." appears.
7. Click ![]() . The file is mapped and a message “Mapping was successfully created” appears.
. The file is mapped and a message “Mapping was successfully created” appears.
Refer to the screenshot:
Once the file is uploaded successfully, the user can view the uploaded file data to the particular clients under Collateral Loans page.
When any specific number of column having blank row in the uploaded file is mapped in the Consider Rows Blank In Column field, the system will still consider the corresponding row from the uploaded file even if the same row is mapped in either Discard Value Column/Select Value Column fields so that the status of the specific loan gets changed into Inactive in Loan Set up page without any dependency of Closing/Principal Balance to be "0.00". But, the Credit Line, Expiry Date and Risk Rating Code will be updated based on the values provided in the uploaded file.
The Loan Paid Off date gets automatically updated with the processed date from Task & Upload History page of that uploaded file under Loan Set up page for the specific loan if the Activity date is blank in the uploaded file. The Loan Paid Off date gets automatically updated with the Activity date under Loan Set up page for the specific loan if the uploaded file has Activity date for the specific loan.
When the Inactivate Loan text provided in the Inactive Loan Text field does not match with Inactive text provided in the file, the corresponding loan cannot be inactivated under Loan Set up page, the exception task will be automatically generated in Task & Upload History page and there will not be any transactions for the respective loans in Collateral Loans page if there is no activity date in the uploaded file; but the credit line and expiry dates will be updated based on the values provided in the uploaded file.
If the Statement Balance Before Loan Balance flag is OFF under Basic Parameters page:
The Risk Rating Code value is shown is all management reports (BBC Executive Trend report, BBC Trend report, Collateral Analysis - Comparative report). Once you map the Risk Rating Code value, you need to update the same in the Basic Client Details page. If there is no value for Risk Rating code in the mapped file, the same is not displayed in the reports. If you undo the mapping in Task & Upload History page, all values are reverted in the Basic Client Details screen except the Risk Rating Code value.
If cash control data on database is matched with the uploaded cash control data, then the system will display the cash control data in Cash Controls field under Basic Client Details page in the following conditions and will not create any exceptional tasks in Task & Upload History page:
When the collateral loan data uploaded mismatches with client's closing balance, the application sends an e-mail alert to the client along with the transaction date. Cync support receives a document which includes a mismatched client list. This e-mail is password protected and the same is used to view the details.
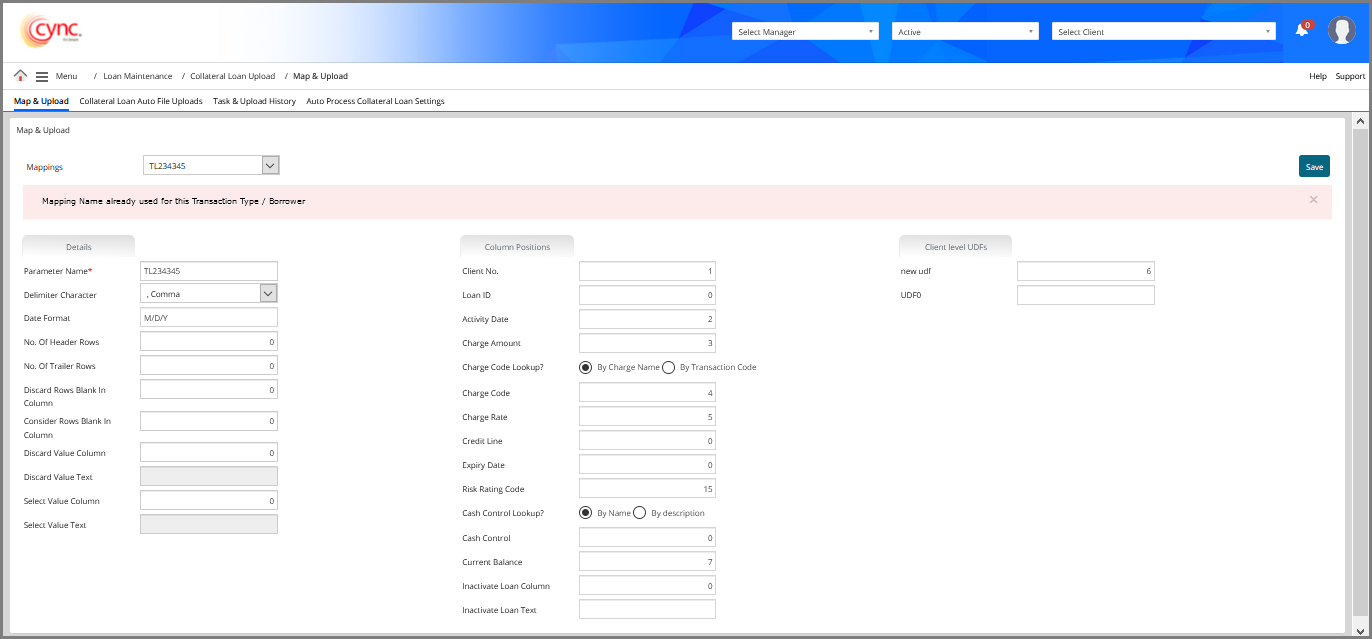
If user enters the duplicate mapping name in Parameter Name field, then the system shows an error notification.
Refer to the screenshot:
If user enters the same column numbers in both Consider Rows Blank In Column field and Discard Rows Blank In Column field while creating new map file or editing the existing map file, then the system shows an error notification.
Refer to the screenshot:
 If user inputs only Discard Value Column without inputting Discard Value text and clicks on the
 ![]() button , then the system shows an error notification.
button , then the system shows an error notification.
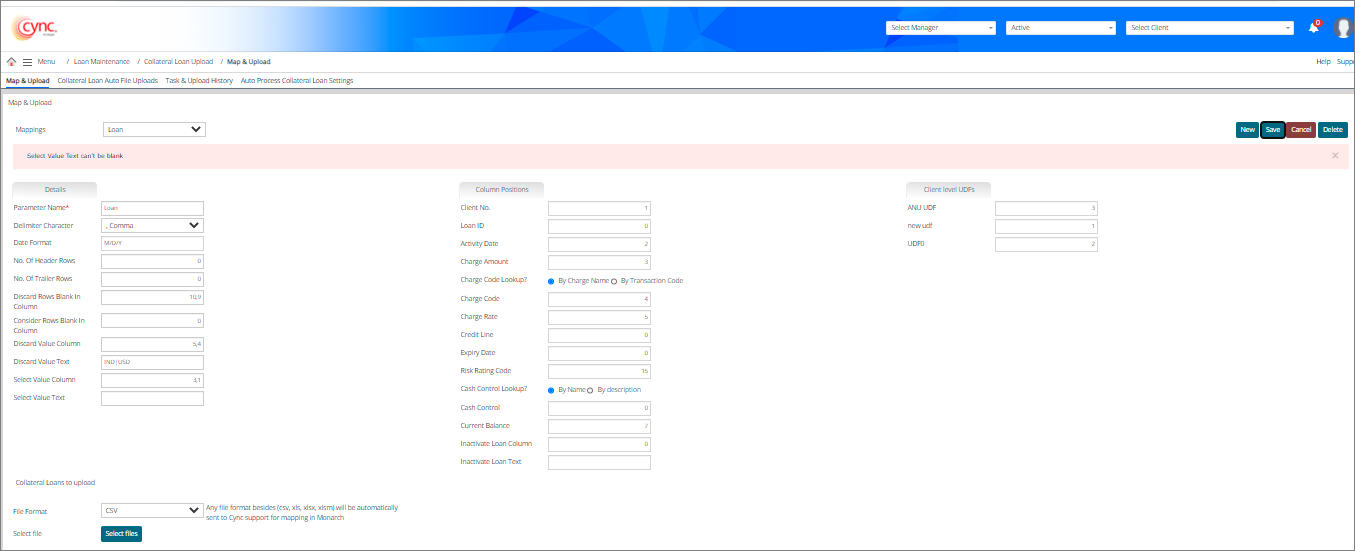
Refer to the screenshot: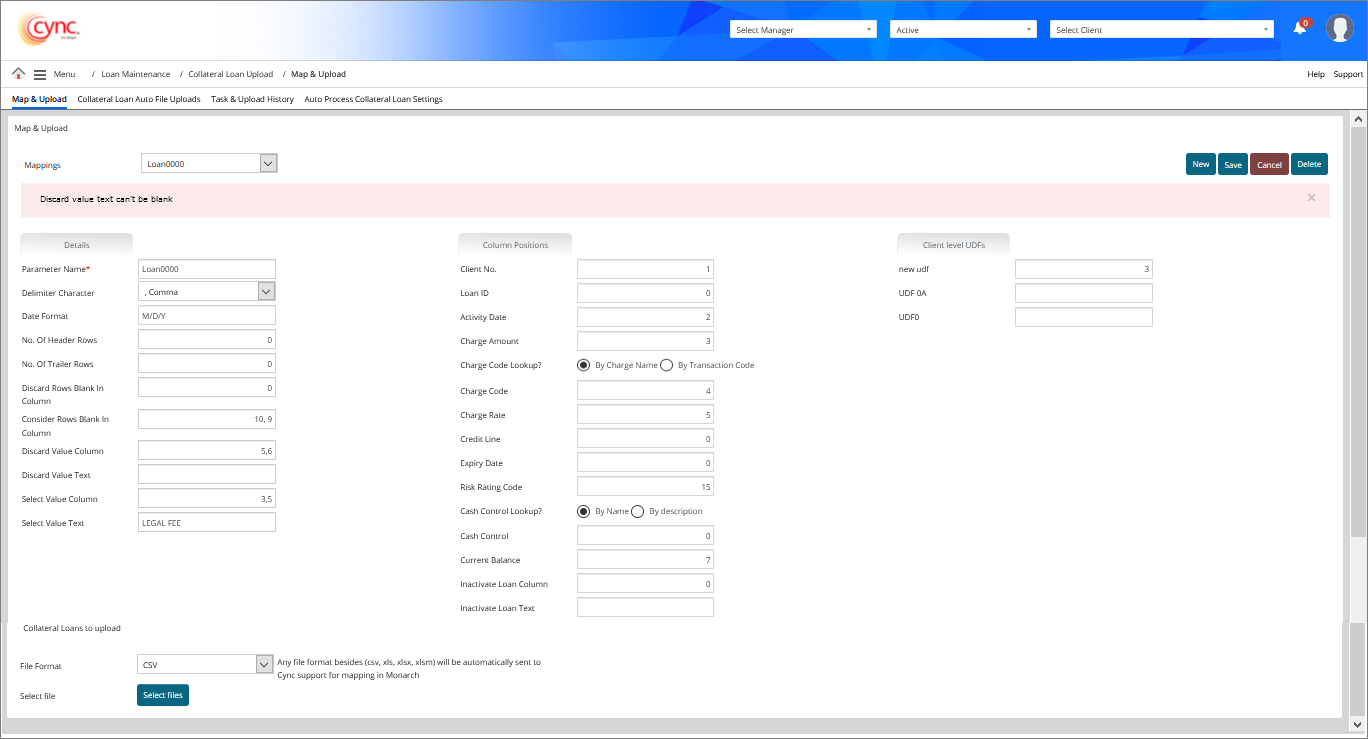 If user inputs only Select Value Column without inputting Select Value text and clicks on the
 ![]() button, then the system shows an error notification.
button, then the system shows an error notification.
Refer to the screenshot:
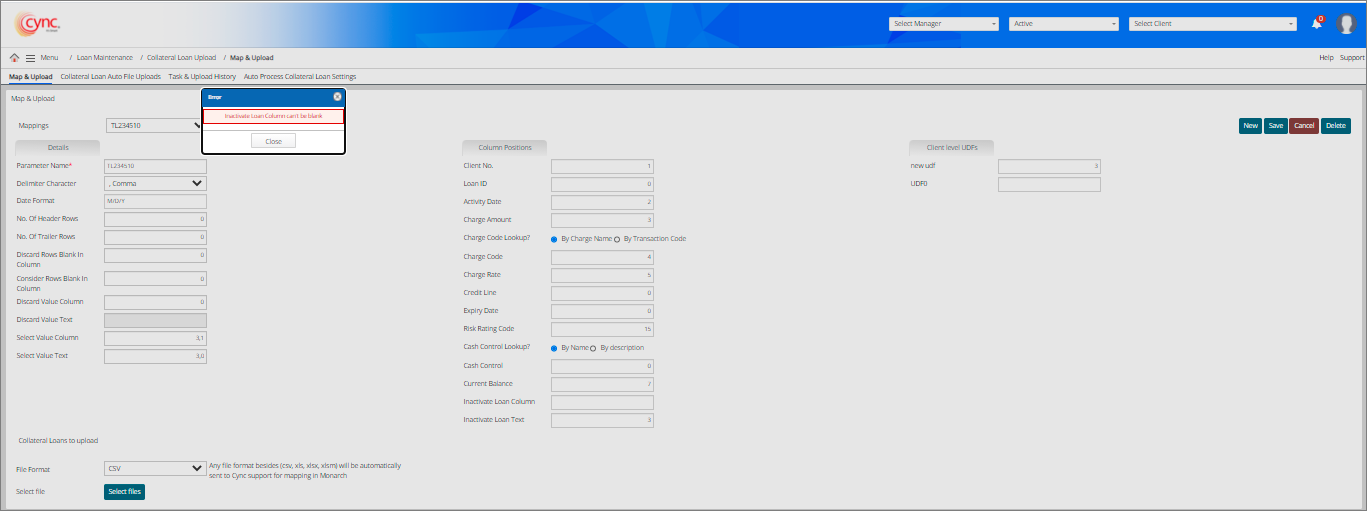
 If user inputs only Inactive Loan Column without inputting Inactive Loan Text and clicks on the
 ![]() button, then the system shows an error notification.
button, then the system shows an error notification.
Refer to the screenshot:
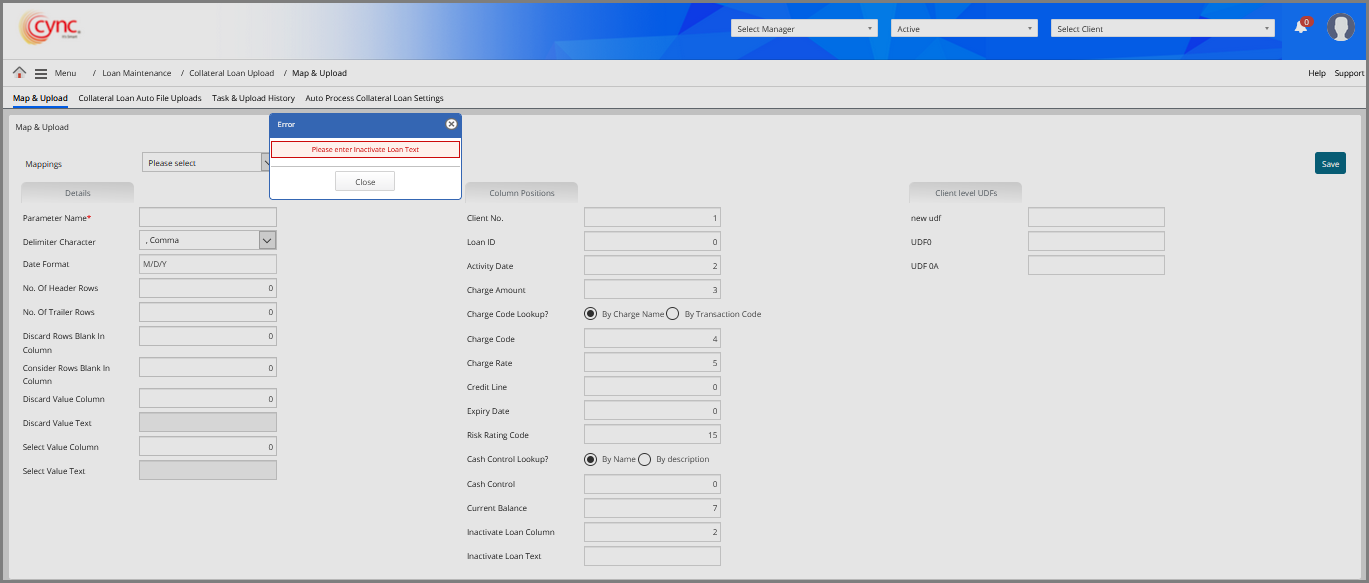 If user inputs only Inactive Loan Text without inputting Inactive Loan Column and clicks on the
 ![]() button, then the system shows an error notification.
button, then the system shows an error notification.
Refer to the screenshot:
To edit the mapped file, perform these steps:
1. Go to Menu → File Uploads → Collateral Loan Upload → Map & Upload. Map & Upload page appears.
2. In the Mappings dropdown list, select the type of mapping you wish to edit. A Collateral Loans to upload section appears.
3. Click the  button.
4. Edit the fields as required.
5. Click the  button to cancel the map file editing process.
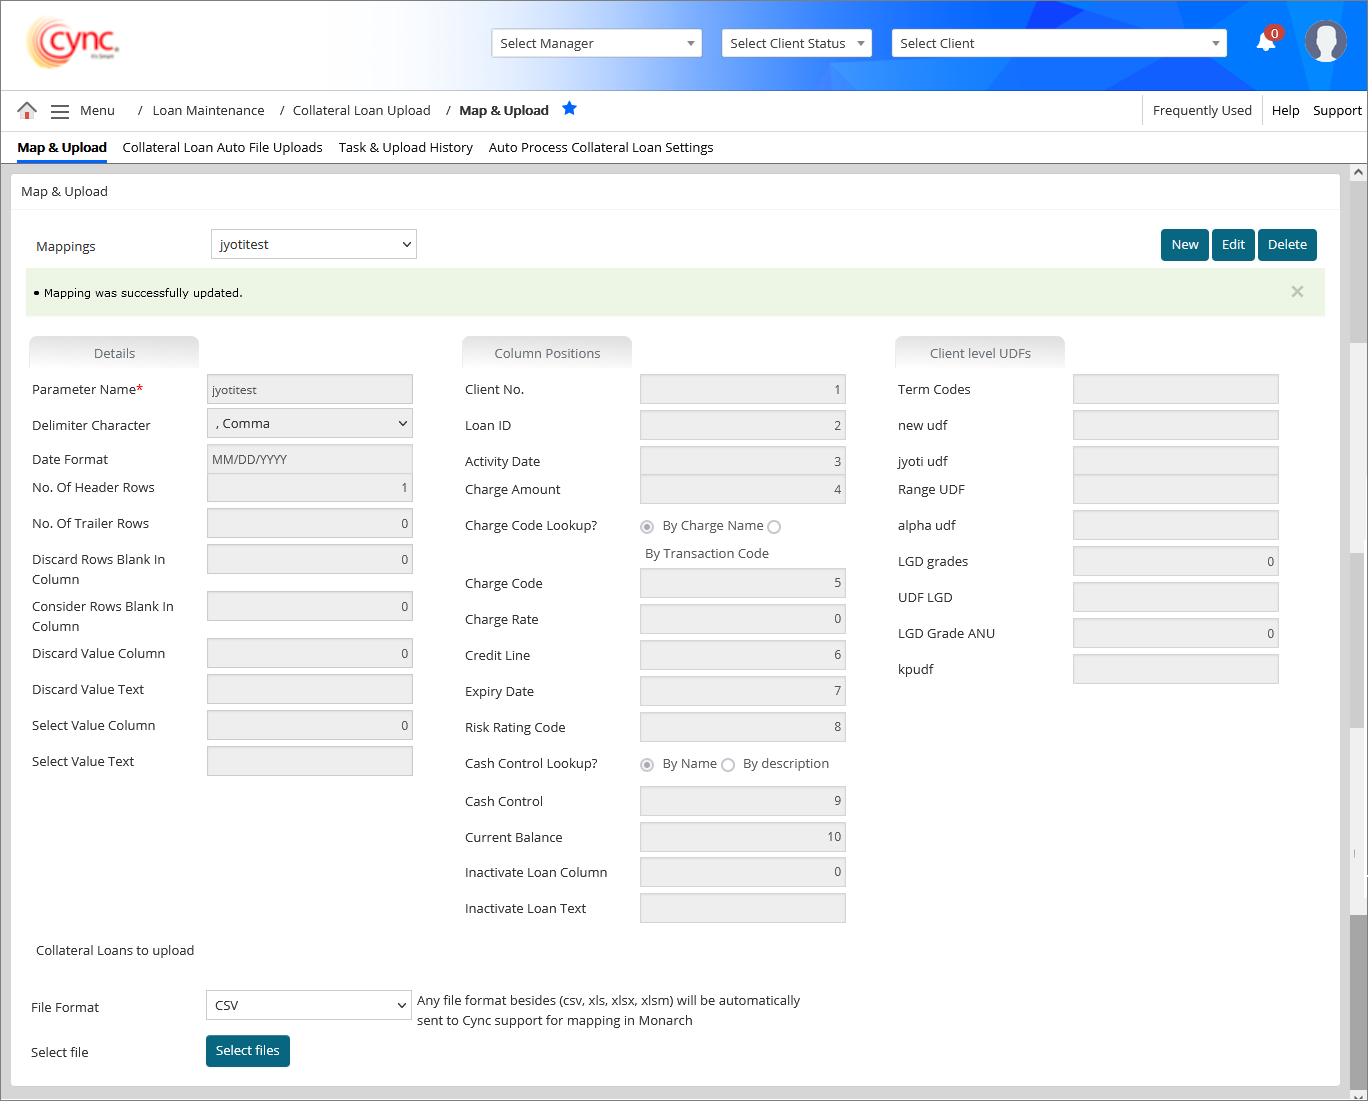
6. Click the  button. The mapped file is updated and a message “Mapping was successfully updated” appears.
The system allows the user to save the UDF field with zero value (for the UDFs which are already mapped with Collateral Loan Upload).
Refer to the screenshot:
To delete the mapped file, perform these steps:
1. Go to Menu → File Uploads → Collateral Loan Upload → Map & Upload. Map & Upload page appears.
2. In the Mappings dropdown list, select the type of mapping you wish to delete. A Collateral Loans to upload section appears.
3. Click the  button. A pop-up message “Are you sure you want to delete?” appears.
4. Click Ok. The file is deleted and a message “Mapping was successfully deleted” appears.
Refer to the screenshot:
